DOM - Document Object Model
The Document Object Model (DOM) represents XML or HTML documents as a tree of nodes. Using DOM methods and properties, you can access any element on the page, modify or delete elements, and add new ones. DOM is a language-independent Application Programming Interface (API) that can be implemented not only in JavaScript, but also in any other programming language. For example, you can generate pages on the server side using the PHP implementation of DOM (php.net/dom).
Any HTML document can be represented as a DOM tree, where each node has its parent and children. Each node in this tree is an object, with its own properties and methods. Empty lines and comments are also considered objects (nodes) in the DOM model.
For all examples, we will use a simple HTML document, the code of which is shown below. And for viewing and working with the console, a separate page has been created - dom_example.html. Open it in a browser tab, press F12 and type along; if you need a refresher on how scripts reach the browser, see Inserting JavaScript into an HTML page.
<!DOCTYPE html>
<html>
    <head>
        <title>My page</title>
    </head>
    <body>
        <p class="opener">first paragraph</p>
        <p><em>second</em> paragraph</p>
        <p id="closer">final</p>
        <!-- and that's about it -->
    </body>
</html>
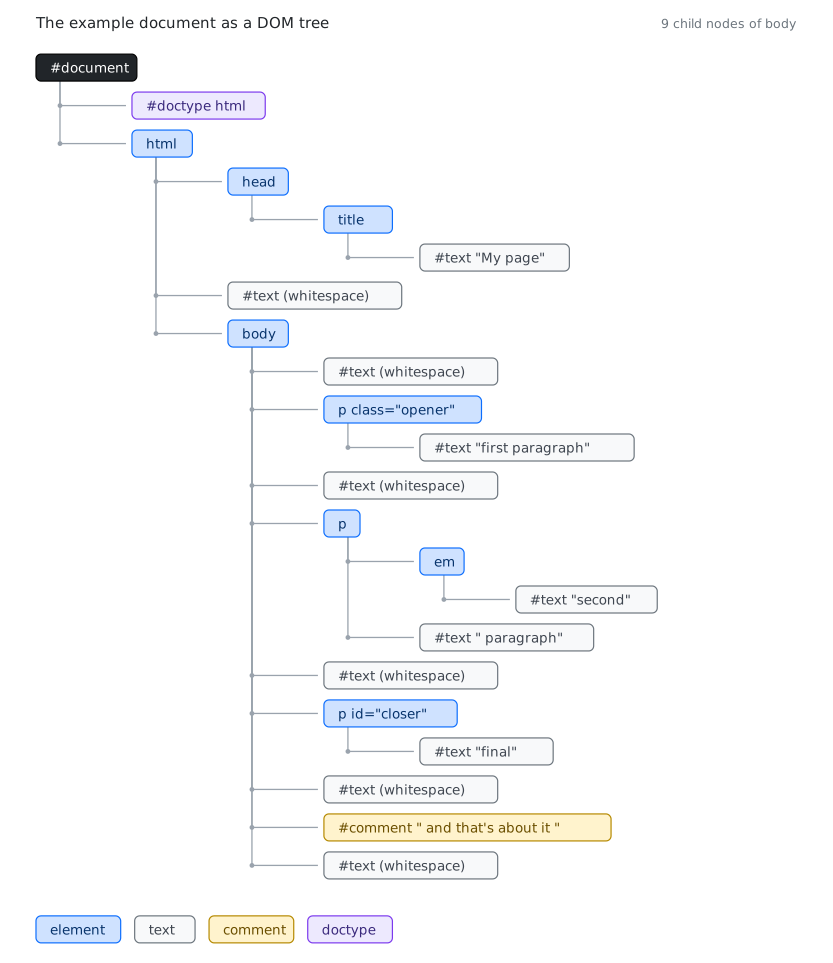
Here is the same document as a tree. Note the #text nodes between the tags: whitespace becomes a node too, and by the end of this article it will hold no surprises for you.
Accessing DOM Nodes
The document Node
The document node represents the entire HTML or XML document and is the root of the DOM tree. It is also the starting point for accessing any element or node in the document.
You can access the document node using the document object, which is a global variable in web browsers.
To investigate this node, execute the command console.dir(document). The console.dir command will display all properties and methods of this node.
All nodes (including the document node, text nodes, element nodes, and comment nodes) have nodeType, nodeName, and nodeValue properties.
> document.nodeType;
9
Every node has a type, exposed as a number. The ones you will actually meet are 1 (element), 3 (text), 8 (comment), and 9 (the document itself). Attribute nodes (2) were part of older DOM specs; since DOM4 they are no longer members of the tree. Instead of memorizing the numbers, compare against the constants the Node interface defines:
> document.nodeType === Node.DOCUMENT_NODE;
true
All nodes also have names. For HTML tags, the node name is the tag name (tagName property). Text nodes have the name #text, and the document node is named as:
> document.nodeName;
"#document"
Nodes can also have a value associated with them. For example, for text nodes, the value is the text content itself. The document node doesn't have any value:
> document.nodeValue;
null
documentElement
The documentElement property is a property of the document object, which represents the root element of the document. This means that documentElement refers to the <html> element in an HTML document.
The root element is the parent element for all other elements in the document and can contain other elements inside itself.
> document.documentElement;
<html>…</html>
nodeType equals 1, which corresponds to an element node:
> document.documentElement.nodeType;
1
For element nodes, the nodeName and tagName properties contain the name of the tag itself:
> document.documentElement.nodeName
"HTML"
> document.documentElement.tagName;
"HTML"
Child nodes
To check if a node has child nodes, you can call the hasChildNodes() method:
> document.documentElement.hasChildNodes();
true
The <html> element has three child nodes: head, body, and a text node between them (most browsers count the whitespace between tags as a node). You can access the child nodes using the childNodes property:
> document.documentElement.childNodes.length;
3

> document.documentElement.childNodes[0];
<head>…</head>

> document.documentElement.childNodes[1];
#text

> document.documentElement.childNodes[2];
<body>…</body>
Each child node has a parentNode property that can be used to access its parent node:
> document.documentElement.childNodes[1].parentNode;
<html>…</html>
Let's save a reference to the body node:
> const bd = document.documentElement.childNodes[2];
Let's see how many child nodes the body has:
> bd.childNodes.length;
9
Let's recall what's inside the body tag:
<body>
    <p class="opener">first paragraph</p>
    <p><em>second</em> paragraph</p>
    <p id="closer">final</p>
    <!-- and that's about it -->
</body>
But why does the body node contain 9 child nodes? Well, 3 p nodes and 1 comment node make up a total of 4 child nodes. The whitespace nodes between these 4 element nodes give us an additional 3 text nodes. That totals to 7 child nodes. The whitespace node between the <body> tag and the first <p> tag will be the eighth child node. The whitespace node between the comment and the closing </body> tag will be the ninth child node. To check these claims, you can run the command bd.childNodes in the console.
Keep this whitespace quirk in mind: it is the reason plain childNodes traversal is fragile, and it is exactly the problem the element-only navigation properties solve later in this article.
Attributes
Since the first child node of the body node is a whitespace node, then the second node (index 1) is the first paragraph in our HTML document:
> bd.childNodes[1];
<p class="opener">first paragraph</p>
To check if an element has attributes, the method hasAttributes() is used:
> bd.childNodes[1].hasAttributes();
true
How many attributes? In our example, there is 1 attribute - class
> bd.childNodes[1].attributes.length;
1
You can access attributes both by index and by name. You can also get the value of an attribute using the getAttribute() method:
> bd.childNodes[1].attributes[0].nodeName;
"class"

> bd.childNodes[1].attributes[0].nodeValue;
"opener"

> bd.childNodes[1].attributes['class'].nodeValue;
"opener"

> bd.childNodes[1].getAttribute('class');
"opener"
For everyday work getAttribute() and setAttribute() are the pair to use; removeAttribute() deletes one. Some attributes are also readable (and writable) as properties of the element:
> document.getElementById('closer').id;
"closer"
The class attribute is the exception: class is a reserved word in ECMAScript, so old code reaches it through the className property. Modern code uses classList instead - we cover it in the Changing Styles section.
Attributes whose names start with data- get their own shortcut, the dataset property. The part after the prefix becomes the key:
> const closer = document.getElementById('closer');

> closer.dataset.status = 'done';
"done"

> closer.getAttribute('data-status');
"done"

> closer.setAttribute('data-status', 'archived');
undefined

> closer.getAttribute('data-status');
"archived"
Accessing the Content of an Element
Let's take a look at the first paragraph of our document:
> bd.childNodes[1].nodeName;
"P"
You can retrieve the text content inside a paragraph by using the textContent property. Its close cousin innerText looks similar but returns the rendered text: it skips whatever CSS hides from view, and reading it makes the browser compute styles, which costs time. Unless you need the text exactly as it appears on screen, use textContent:
> bd.childNodes[1].textContent;
"first paragraph"

> bd.childNodes[1].innerText;
"first paragraph"
There is also the innerHTML property, which returns (or sets) the HTML code contained within the node. It can be noticed that such behavior somewhat contradicts the DOM model, which represents the document as a tree of nodes rather than a string of tags. However, the innerHTML property has proven to be so convenient that it is widely used.
> bd.childNodes[1].innerHTML;
"first paragraph"
my.innerHTML = userInput is the classic XSS opening. A <script> tag pasted this way won't execute, but an <img src=x onerror=...> will. Use textContent for plain text, and sanitize HTML from untrusted sources with a library like DOMPurify. The platform's own Sanitizer API (element.setHTML()) is on the way, but it is not Baseline yet - check the support table before relying on it.
The first paragraph contains only text, so both innerHTML and textContent will return the same value. However, the second paragraph contains an em node, so we can observe the differences in the properties:
> bd.childNodes[3].innerHTML;
"<em>second</em> paragraph"

> bd.childNodes[3].textContent;
"second paragraph"
Another way to retrieve the text within the first paragraph is to use the nodeValue property of the text node contained within the p element. This is how you reach one specific text node when you need it - for everyday text work, textContent covers it:
> bd.childNodes[1].childNodes.length;
1

> bd.childNodes[1].childNodes[0].nodeName;
"#text"

> bd.childNodes[1].childNodes[0].nodeValue;
"first paragraph"
Finding elements: querySelector and friends
By using the properties childNodes, parentNode, nodeName and nodeValue, you can traverse the DOM tree and perform various operations on document nodes. But counting whitespace nodes by hand is fragile: change one line of markup and your indices break. In real code you select elements directly.
querySelector() takes any CSS selector and returns the first matching element, or null when nothing matches:
> document.querySelector('.opener');
<p class="opener">first paragraph</p>

> document.querySelector('#closer');
<p id="closer">final</p>

> document.querySelector('.does-not-exist');
null
querySelectorAll() returns every match as a static NodeList. It is iterable and has forEach, so for...of, spreading and destructuring all work:
> document.querySelectorAll('p').length;
3

> document.querySelectorAll('p em').length;
1

> for (const p of document.querySelectorAll('p')) console.log(p.textContent);
first paragraph
second paragraph
final
getElementById() is still the fastest single lookup, and IDs must be unique in a document anyway, so it remains a perfectly modern call:
> document.getElementById('closer');
<p id="closer">final</p>
Two helpers pair naturally with querySelector: matches() checks an element against a selector, and closest() walks up the tree and returns the nearest ancestor that matches the selector:
> document.querySelector('em').closest('p');
<p>…</p>

> document.getElementById('closer').matches('p#closer');
true
You will also meet the older selection family: getElementsByTagName(), getElementsByClassName() and getElementsByName() (the last one targets form controls with name attributes and has few uses outside them). They return live collections: a HTMLCollection that updates itself when the document changes, which is a source of subtle bugs when you remove nodes while iterating. querySelectorAll() returns a static snapshot instead - one more reason it is the default choice.
Element-only navigation
The whitespace problem you saw in the child nodes section has a direct fix. Every node that can hold children also exposes a family of properties that see element nodes only:
> document.body.children.length;
3

> document.body.firstElementChild;
<p class="opener">first paragraph</p>

> document.body.lastElementChild;
<p id="closer">final</p>

> document.body.childElementCount;
3
children is a live HTMLCollection of the element children - the five whitespace text nodes and the comment are invisible to it. The same idea works horizontally:
> const closer = document.getElementById('closer');

> closer.previousElementSibling;
<p>…</p>

> closer.nextElementSibling;
null
No #text hops, no counting. In new code, reach for the Element family first and drop down to childNodes, firstChild and nextSibling only when you deliberately need text and comment nodes.
Siblings: nextSibling and previousSibling
nextSibling and previousSibling are two convenient properties for navigating the DOM tree when you already have a reference to a specific node. They step through all kinds of nodes, whitespace included:
> const para = document.getElementById('closer');
> para.nextSibling;
#text

> para.previousSibling;
#text

> para.previousSibling.previousSibling;
<p>…</p>

> para.previousSibling.previousSibling.previousSibling;
#text

> para.previousSibling.previousSibling.nextSibling.nextSibling;
<p id="closer">final</p>
Count the hops you need to get anywhere: that is the tax of node-level navigation, and it is why previousElementSibling and nextElementSibling exist.
document.body
document.body is a property that represents the <body> element of an HTML document. It provides access to the content within the <body> tag, which is the main area of the webpage visible to the user.
> document.body;
<body>…</body>

> document.body.nextSibling;
null

> document.body.previousSibling.previousSibling;
<head>…</head>
firstChild and lastChild
firstChild and lastChild are properties of a DOM node that provide access to its first and last child nodes, respectively. firstChild is equivalent to childNodes[0], and lastChild is equivalent to childNodes[childNodes.length - 1]:
> document.body.firstChild;
#text

> document.body.lastChild;
#text

> document.body.lastChild.previousSibling;
<!-- and that's about it -->

> document.body.lastChild.previousSibling.nodeValue;
" and that's about it "
Both have *ElementChild twins that skip the whitespace - firstElementChild and lastElementChild - covered in the element-only navigation section.
Traversing DOM
Finally, here is a function that takes any DOM node and traverses the entire DOM tree starting from the given node (recursion is the trick here - if it is new to you, read Functions in JavaScript first):
function walkDOM(n) {
    do {

        console.log(n);

        if (n.hasChildNodes()) {
            walkDOM(n.firstChild);
        }

    } while (n = n.nextSibling);
}
Usage example:
> walkDOM(document.documentElement);
> walkDOM(document.body);
Modifying DOM Nodes
Let's save a reference to the last <p> tag in a variable (remember that we are using a separate test page for all the examples):
> const my = document.getElementById('closer');
The safest way to change text is to assign to textContent - it treats the string as plain text, never as markup:
> my.textContent = 'final!!!';
"final!!!"
When you do need markup, innerHTML parses an HTML-formatted string and you can create a new element node as follows:
> my.innerHTML = '<em>my</em> final';
"<em>my</em> final"
The new em-node becomes part of the DOM tree:
> my.firstChild;
<em>my</em>

> my.firstChild.firstChild;
#text "my"
Another way to change the text inside a tag is to directly access the text node and modify its nodeValue property - textContent is the shortcut that does the same job without the digging:
> my.firstChild.firstChild.nodeValue = 'your';
"your"
Changing Styles
More often, we need to change the presentation of elements rather than their content. All elements have a style property, which in turn contains properties that correspond to CSS properties. Here's an example of how you can change the style of a paragraph by adding a red border to it:
> my.style.border = "1px solid red";
"1px solid red"
CSS properties are often written with hyphens, which are not valid in JavaScript identifiers. In such cases, you should omit the hyphen and convert the following letter to uppercase. Thus, the CSS property padding-top becomes paddingTop, margin-left becomes marginLeft, and so on:
> my.style.fontWeight = 'bold';
"bold"
Or skip the camelCase dance entirely: setProperty() takes the CSS name with its hyphen as is, which is handy when the property name comes from a variable:
> my.style.setProperty('border-style', 'dashed');
undefined

> my.style.borderStyle;
"dashed"
The cssText property shows the whole inline style as one string:
> my.style.cssText;
"border: 1px dashed red; font-weight: bold;"
You can technically append to it (cssText += " border-style: dashed;"), but that rewrites the entire inline style at once and is easy to get wrong. Prefer individual properties or setProperty().
In real projects, most styling belongs in CSS classes, and scripts only toggle them. That is the job of classList:
> my.classList.add('highlight');
undefined

> my.classList.contains('highlight');
true

> my.classList.toggle('highlight');
false
classList.add(), remove(), toggle() and contains() replace the old className string juggling. The test page has no stylesheet attached, so toggling a class there changes nothing visually - in your own pages it is the main tool for state-driven styling.
Events: addEventListener()
DOM manipulation usually starts from an event: a click, a keystroke, a form submit. The modern way to listen is addEventListener() - it allows several listeners on the same element and separates behavior from markup:
> document.body.addEventListener('click', (e) => console.log(e.target));
undefined
Click any paragraph on the test page now - the console prints the exact element you clicked.
The standard pattern for many elements is one listener on a common ancestor plus closest() - event delegation:
document.body.addEventListener('click', (e) => {
    const p = e.target.closest('p');
    if (p) p.classList.toggle('marked');
});
The options object covers the rest: { once: true } fires a single time, and signal accepts an AbortController that detaches the listener when you call abort() - the standard cleanup pattern for listeners that must not leak:
const controller = new AbortController();

document.body.addEventListener('click', handler, {
    once: true,
    signal: controller.signal
});

// later:
controller.abort();
The inline onclick="..." attributes you will meet in old code are the legacy path - a single listener per property, and behavior glued into markup.
Creating and Inserting Nodes
To create new nodes in the Document Object Model, you use createElement() and createTextNode(). Once you have created a new node, you attach it to the tree with the insertion methods: append(), prepend(), before() and after().
Creating a new p-element node and setting its text content:
> const myp = document.createElement('p');
> myp.textContent = 'yet another';
"yet another"
The new element automatically inherits all default properties, including the style property, which you can modify:
> myp.style.border = '2px dotted blue';
"2px dotted blue"
append() adds the node to the end of the parent's children:
> document.body.append(myp);
undefined
The new p-element is now at the end of the page. Note that append() returns undefined - its older sibling appendChild() returned the node, one of the small differences between the two generations of the API.
Insertion methods accept several arguments, and plain strings become text nodes, so building a small fragment takes one call:
> document.body.append('plain text node', document.createElement('hr'));
undefined
The rest of the family mirrors it: prepend() inserts at the beginning, before() and after() place nodes relative to an existing one, and replaceWith() swaps it out:
> document.body.prepend('first line!');
undefined

> document.querySelector('#closer').before('right before the final paragraph');
undefined

> document.querySelector('#closer').after(document.createElement('hr'));
undefined

> const second = document.querySelectorAll('p')[1];
> second.replaceWith('replaced!');
undefined
insertAdjacentHTML()
For inserting an HTML string at a precise spot, insertAdjacentHTML() takes a position relative to the element and the markup:
<!-- beforebegin -->
<p>
    <!-- afterbegin -->
    existing text
    <!-- beforeend -->
</p>
<!-- afterend -->
> document.body.insertAdjacentHTML('beforeend', '<p>boo!</p>');
undefined
Sibling methods insertAdjacentElement() and insertAdjacentText() do the same for nodes and plain strings. Compared with innerHTML +=, which re-parses and replaces everything inside the element (destroying listeners and state in the process), insertAdjacentHTML() touches only the inserted fragment - which is why it is the go-to for appending markup.
The template pattern
When the same markup gets inserted more than once, the HTML <template> element is the standard tool. Its content is a DocumentFragment: inert, invisible, and ready to clone:
> const tpl = document.createElement('template');

> tpl.innerHTML = '<p class="note">a note from a template</p>';

> document.body.append(tpl.content.cloneNode(true));
undefined

> document.body.append(tpl.content.cloneNode(true));
undefined
The cloneNode(true) call matters: appending tpl.content directly would move its children into the page and leave the template empty after the first use. In real pages the template usually lives in the HTML itself - <template id="note-tpl">…</template> - and you clone document.querySelector('#note-tpl').content per insertion.
cloneNode()
Another way to create new nodes is by copying (or cloning) an existing node. The cloneNode() method is used for this purpose and accepts a boolean parameter (true for deep cloning, including all child elements, false for shallow cloning of only the current element). Let's use this method.
If you have been adding nodes along the way, reload the test page first. Let's save a reference to the element we want to copy in a variable:
> const el = document.querySelectorAll('p')[1];
Now the variable el refers to the second paragraph, which looks like this:
<p><em>second</em> paragraph</p>
Let's perform a shallow copy of this element and insert it into the body:
> document.body.append(el.cloneNode(false));
undefined
You won't see any changes on the page because with shallow copying, only a copy of the <p> element is created without its nested elements. This means that the text inside the paragraph (which is a child text node) will not be copied.
The executed code is equivalent to the following:
> document.body.append(document.createElement('p'));
undefined
If deep copying is performed, the entire DOM tree starting from the P-element will be copied, including the text nodes and the EM-element. The following code will fully copy the second paragraph to the end of the document:
> document.body.append(el.cloneNode(true));
If you prefer, you can copy only the EM node:
> document.body.append(el.firstChild.cloneNode(true));
<em>second</em>
... or only the text node with the value 'second':
> document.body.append(el.firstChild.firstChild.cloneNode(false));
"second"
Legacy methods you will still meet
The append() family replaced an older generation of parent-oriented methods. You will meet them in every codebase written before the mid-2010s, and they still work - here is the mapping:
| Old call | Modern equivalent | Difference |
|---|---|---|
parent.appendChild(node) | parent.append(node) | append() takes several arguments and plain strings |
parent.insertBefore(node, ref) | ref.before(node) | call it on the reference node, not the parent |
parent.replaceChild(new, old) | old.replaceWith(new) | same flip of subject |
parent.removeChild(child) | child.remove() | remove() needs no parent reference |
For example, the old recipe for inserting a text node as the first child of the BODY read like this:
> document.body.insertBefore(
    document.createTextNode('first boo!'),
    document.body.firstChild
);
Older code also builds text with explicit createTextNode() calls instead of textContent. The classic four-step recipe for <p>one more paragraph <strong>bold</strong></p>:
// Create a P element node
const myp = document.createElement('p');

// Create a text node and append it to the P element node
const myt = document.createTextNode('one more paragraph ');
myp.appendChild(myt);

// Create a STRONG element node and append a text node to it
const str = document.createElement('strong');
str.appendChild(document.createTextNode('bold'));

// Append the STRONG element node to the P element node
myp.appendChild(str);

// Append the P element node to the BODY
document.body.appendChild(myp);
The modern version does the same in four short lines:
const p = document.createElement('p');
p.textContent = 'one more paragraph ';
const strong = document.createElement('strong');
strong.textContent = 'bold';
p.append(strong);
document.body.append(p);
Removing Nodes
To remove a node, call remove() on the node itself - no parent reference needed (again: if you have been adding nodes along the way, reload the test page first):
> const myp = document.querySelectorAll('p')[1];
> myp.remove();
undefined
remove() returns undefined. Its older counterpart removeChild() returns the removed node, which is handy when you plan to reinsert it later:
> const removed = document.body.removeChild(document.getElementById('closer'));
<p id="closer">final</p>

> document.body.contains(removed);
false

> removed.firstChild;
#text "final"
The reference stays fully working: contains() just confirmed the node is gone from the document, yet you can still read it, modify it, and reinsert it with append() whenever you want. There is also replaceWith() to swap a node in one call - it returns undefined, while the legacy replaceChild() returned the replaced node.
The modern one-liner for removing all children of an element is replaceChildren() called with no arguments:
> document.body.replaceChildren();
undefined

> document.body.firstChild;
null
The older quick way was assigning an empty string to innerHTML - it still works, but replaceChildren() says exactly what it does. To clear children with only the classic methods, you would need to traverse all descendants of the node and remove each one individually. Here's a small function that removes all nodes starting from the provided node:
function removeAll(n) {
    while (n.firstChild) {
        n.removeChild(n.firstChild);
    }
}
You can call this function with the desired node as an argument to remove all its descendants:
> removeAll(document.body);
Cheat Sheet
The methods of this article on one screen - modern call first, the legacy equivalent you will meet in older code next to it:
| Task | Modern call | Legacy you will meet |
|---|---|---|
| Select one element | querySelector(), getElementById() | getElementsByTagName('p')[0] |
| Select many elements | querySelectorAll() (static) | getElementsBy*() (live) |
| Nearest matching ancestor | closest() | - |
| Check against a selector | matches() | - |
| Element children | children, firstElementChild | childNodes, firstChild |
| Horizontal navigation | nextElementSibling | nextSibling |
| Read or write text | textContent | innerText, nodeValue |
| Insert an HTML string | insertAdjacentHTML() | innerHTML += |
| Append / prepend | append(), prepend() | appendChild(), insertBefore() |
| Place next to a node | before(), after() | insertBefore() |
| Replace a node | replaceWith() | replaceChild() |
| Remove a node | remove() | removeChild() |
| Remove all children | replaceChildren() | innerHTML = '' |
| Work with classes | classList | className |
Work with data-* attributes | dataset | getAttribute() / setAttribute() |
| Set a CSS property | style.setProperty() | cssText juggling |
| Listen to events | addEventListener() | onclick="..." attributes |
FAQ
What is the difference between innerHTML and textContent?
textContent reads and writes plain text and never parses markup - it is safe with any string, including data from users. innerHTML parses the string as HTML: convenient for trusted markup, an XSS vector the moment the string is not fully under your control. Rule of thumb: default to textContent, reach for innerHTML with a reason.
HTMLCollection or NodeList - what does querySelectorAll return?
querySelectorAll() returns a static NodeList: a snapshot that supports forEach, for...of and spread. The getElementsBy*() family returns a live HTMLCollection that reflects document changes immediately and has no forEach - wrap it with Array.from() when you need array methods.
Why does firstChild return #text instead of my element?
Whitespace between tags - the newline and indentation in your markup - becomes a text node, and firstChild counts every node type. When you want elements only, use firstElementChild, children or nextElementSibling; the node-level properties stay for the moments when text and comment nodes are exactly what you need.